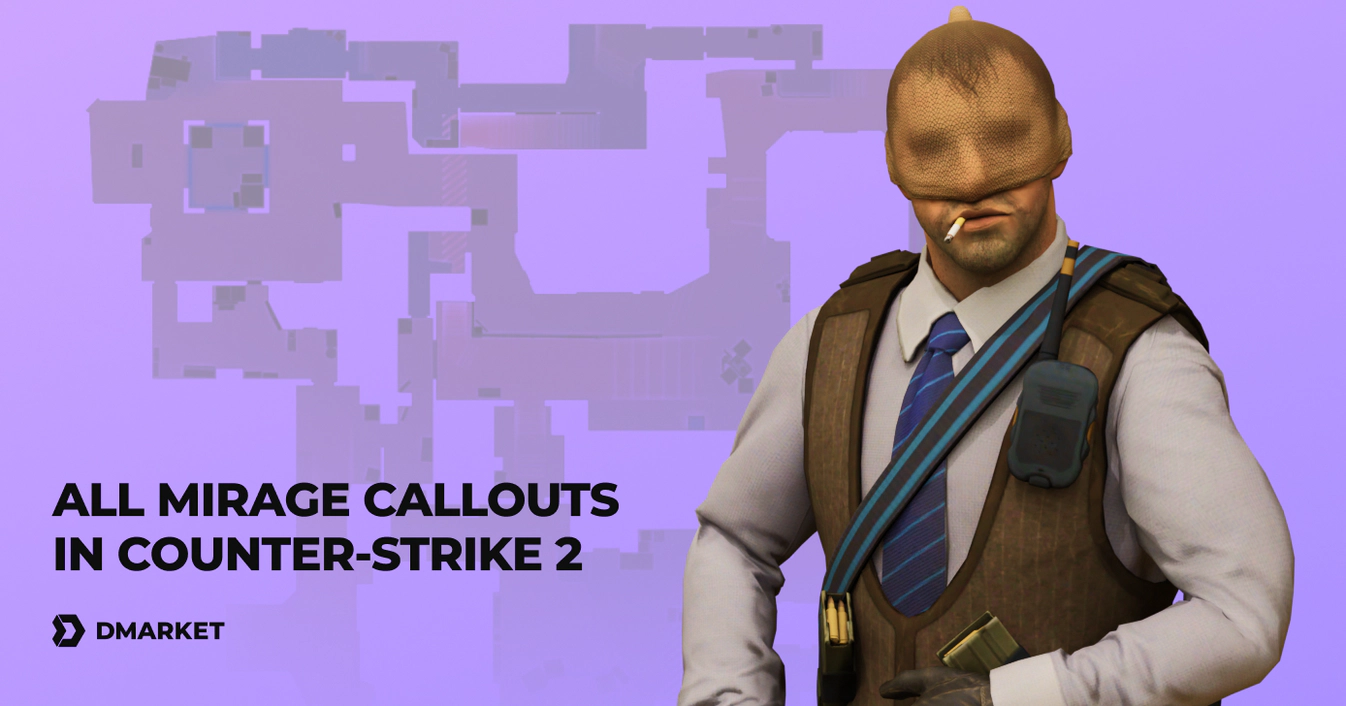
All Mirage Callouts in CS2
Success in Counter-Strike 2 is based on two main elements: personal skills and team actions. Both are important, and both support each other. You need to be agile with your movement and accurate with your shooting to be a reliable teammate. And you need to know team communication strategies for your playing skills to shine in a CS2 match.
Callouts are mainly about team play, as they help players coordinate their actions. CS2 Mirage callouts are essential to know, as the map is one of the best and the most popular in the game.
It’s important to learn callouts step by step. Take Mirage—the map is filled with details and places. The list of callouts here may look like a huge amount of information. It’s true, and everyone can easily get confused by callouts for Mirage in Counter-Strike 2. But if you approach them gradually and learn with practical effectiveness, you will know them in no time!
Importance of Mirage in Counter-Strike
An outsider to the community may say “Mirage? It’s just one of the maps!” Well, if you play the game actively, you know it’s not so. Mirage is one of a few iconic maps. It’s one of the cornerstones of Counter-Strike. Mirage is one of the best CS2 maps for professional esports, as literally every big tournament features it. It’s also one of the most-played maps for competitive and casual matchmaking.
Even without this history and reputation, Mirage is just an excellent place for shooting matches. It’s fairly balanced, it opens opportunities for tricky strategies, and it’s interesting to play on.
Mirage callouts are the must-know aspect of CS2 for any even slightly serious player.
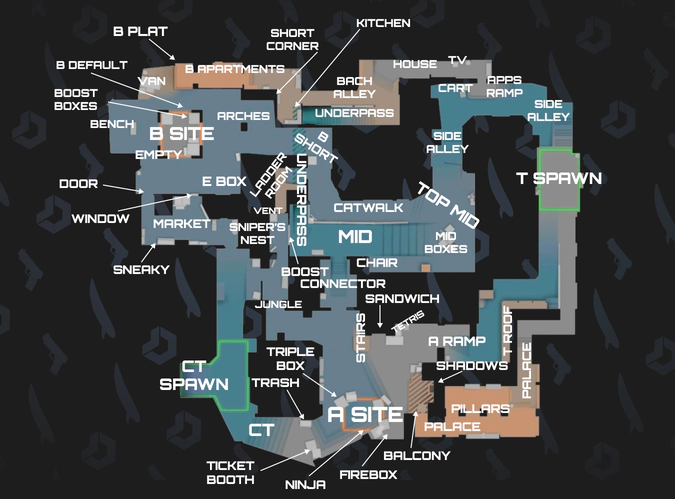
CS2 Mirage Callouts
The main difficulty with learning callouts on Mirage is the number of spots concentrated on this map. To simplify the understanding, let’s group the callouts by the main areas.
Bombsite A and around
There are many hiding spots on Mirage’s bombsite A, and it’s important for both teams to know what to name them for team coordination.
- A Site — use this Mirage callout to highlight the area for planting the bomb. The whole bombsite is too big to have just one callout.
- Trash — CT players use the trash can to relatively safely check bombsite A—you need to jump on it to do so.
- Triple Box/Danger Box — this pile of boxes is another obstacle to hide behind. It’s often used by Counter-Terrorists, as Triple Box is closer to their spawn.
- Ticket Booth — this gray column is located close to the CT Spawn. Jumping on it allows players, and especially AWPers, to see over the smoke.
- Ninja — there is a spot to hide between boxes on A. Players may use it to camp and wait for the attacking team.
- Firebox — it’s a small hidden area in the depths of bombsite A. You need to be aware of it as both attacker and defender. Someone may forget to check it. Some players know that it’s easy to throw Molotov/Incendiary there to force the campers out.
- Balcony — it’s a pretty straightforward CS2 callout for Mirage. There is a wooden balcony on bombsite A. Use Balcony for everything located on it.
- Shadows — this callout is also related to the balcony on A, but it refers to the space beneath.
- Palace — the building (internal space) connects T Spawn and bombsite A. As the area close to A is more important for both teams, Palace most often refers to it.
- Pillars — this callout indicates the pillars in Palace and the area around them.
- A Ramp — it’s an alternative entrance to bombsite A from T Spawn.
- T Roof — this area is located right near A Ramp, and Terrorists gather here before throwing grenades and entering A.
- Connector — the passageway from Mid to A is super important for both teams. It should be secured by the defenders. Attackers may risk using it.
- Stairs — the actual stairs that start right after the Connector. The defending team may camp on them and on Sandwich, an area the Stairs lead to, to observe A Ramp and Balcony.
- Sandwich — this small area after Stairs gives players a view on A Ramp and Balcony. It’s dangerous to just stay there, so many players move around Sandwich and Stairs to change their view angle regularly.
- Tetris — the boxes are located between Sandwich and A Ramp. It’s a good place for the defending team to hide. The attackers may use Tetris as an intermediate area during their A Ramp push. It is possible to jump between Sandwich and Tetris.
- Jungle — it’s an alternative to Connector for entering A. Jungle is part of a passageway across Mid towards B Short. Counter-Terrorists may go there to try and control Mid from Sniper’s Nest.
- Sniper’s Nest/Window — there is a window in the passageway between Jungle and B Short. It’s often used by CT snipers to control all the activities on Mid.
- Vent — the hole is covered by a metal plate at the start of each round. Players need to crash it to enter Sniper’s Nest from CT Spawn.
- Ladder Room — it connects B Short and Sniper’s Nest. Terrorists may use it to head to Jungle and to check/clear Sniper’s Nest.
Bombsite B and around
It feels like this bombsite is used less than A, but it’s also a very interesting place for combat. Both teams have a variety of options here to hide and push aggressively.
- B Site — it’s literally the square area in the middle to plant the bomb on. It’s surrounded by columns (pillars), making the combat here quite unpredictable.
- Empty — a pillar on B Site has a callout: one located closer to Market (Door). The callout can be used to indicate your or the opponent’s position on B.
- Boost Boxes — there are boxes near B Site closer to B Apartment. Players can boost each other to jump on the top for somewhat unusual camping on B.
- E Box — it’s literally a box located in the corner of bombsite B. It can provide a safe place for players to watch for attackers from B Apartment or B Short (via Arches).
- Arches — the area with arches that connects B Short and B Site.
- Short Corner/Cat Corner — the corner near B Short, right at the entrance to bombsite B.
- Window — the actual window opens a view from Market to B Site. It’s half-blocked at the beginning of each round, and players should break the wooden panels.
- Door — an entrance to Mirage’s bombsite B from Market.
- Market — this room (a shop) connects T Spawn and bombsite B. Counter-Terrorists should use it to observe B Site before entering through Window.
- Sneaky — it’s a spot on the fridge in Market. Some players sneak there to wait for anyone entering the room.
- Bench — it is located in the dead end of bombsite B. It’s a nice camping place for the defending team.
- Van — players can use it as a boost to proceed to B Apartments. The truck also helps to see this entrance to B. Jump on it and shoot everyone in the building.
- B Plat — it’s a platform right before (after) B Apartments. It opens a view to bombsite B, but players are not safe here.
- B Apartments — an internal room for Terrorists to enter bombsite B. In a way, it’s counterpart to Palace on A.
- Kitchen/Stove — a small room before B Apartments from the T Spawn side. Players can also enter it through B Short by breaking through a small window.
T Spawn towards Mid and B
The T Spawn area doesn’t have many callouts. After the round starts, the Terrorist team may choose to go to A through Palace or A Ramp—these CS2 Mirage callouts have been explained in the bombsite A section. Or, Terrorists may go to Mid or bombsite B via Side Alley.
The Mid callouts on Mirage are later on in our Counter-Strike 2 guide. Here we highlight those directly connected to T Spawn and Terrorists’ starting path to B.
- Side Alley — it’s an area directly after T Spawn. Here, Terrorists may decide to go to Mid or to enter T Apartments and proceed to bombsite B.
- Apps Ramp — players use this ramp to enter T Apartments. As a callout, it may be used to generally indicate the area on Side Alley.
- Cart/Ramp Boxes — there are boxes in the corner of Side Alley. Players can jump on them to proceed to T Apartments or to have a view of Top Mid.
- T Apartments/House — it’s the first part of the internal passageway between T Spawn and bombsite B.
- TV — there is a TV set inside T Apartments, closer to Apps Ramp (T Spawn).
- Back Alley — it’s a connector between T and B Apartments.
- Underpath — it is possible to use this underpass to reach Mid from T Apartments. Players may go right to Connector.
Mid
This area is very important on Mirage. It’s big, and having control over it helps players be creative in their rotation and unpredictable in their decisions. Here are callouts for CS2 Mirage’s Mid.
- Top Mid — Terrorists enter Mid through this area, right after Side Alley.
- Mid Boxes — this set of boxes on Top Mid can provide Terrorists with a relatively safe spot when they rush to Mid.
- Mid — it’s a callout for the general big area in the middle of Mirage.
- Chair — it indicates a spot on Mid. This corner can be used to hide from Sniper’s Nest or camp for opponents on Mid.
- Boost Connector — there are ledgers underneath Sniper’s Nest, and players can boost each other to reach that window.
- Catwalk — the upper side of Mid leads to B Short. Terrorists may choose this way to enter bombsite B or to observe Connector from a distance.
- B Short/Cat Short — this area connects bombsite B and Catwalk; it’s one of the entrances to B.
Advice on Learning CS2 Mirage Callouts
Mirage is a nicely balanced map, but if you look at it through the callouts, it may seem over-complicated. To avoid this difficulty, use Mirage’s straightforward nature and sufficiently play on it before starting to learn the callouts. The map is quite intuitive, so enjoy this period of messing around—probably not in competitive mode.
Then, try to concentrate on one specific area. It is totally ok to only play on A for a while.
If you are on the CT side, you need to learn everything directly around A Site. Camp there, waiting for attackers, and you will soon understand that there are not too many spots for you to remember.
If you are on the T side, practice entering through Palace and A Ramp—and then try to name where you see your opponents.
After such training on bombsite A, do the same for B. Gradually expand your active callouts to Mid and to the full map. It’s a good idea to enter Mirage without the distraction of actual matches. Select practice from the game menu, remove CS2 bots, and let yourself explore.
Also, you may need to have the mirage callouts open for you while you are playing—to remember some spots in the breaks between rounds. Have this article open on your phone to take a quick look.
FAQ
Why are callouts on Mirage so important?
Mirage relies heavily on coordinated mid control and fast rotations. Clear callouts help teammates react instantly, whether you’re defending a site, retaking, or preparing a split. Good communication often decides rounds on this map.
What are the most important Mirage callouts to learn first?
Start with the essentials:
- A Site: Palace, Tetris, Stairs, Jungle, CT
- Mid: Top Mid, Window, Connector, Catwalk
- B Site: Apartments, Bench, Van, Market These are used every round and will help you follow team comms immediately.
What’s the best way to memorize Mirage callouts?
A few effective methods:
- Play deathmatch or DM servers on Mirage and think about where you spawn and move.
- Watch pro matches and pay attention to the caster callouts.
- Walk around Mirage in an offline server and say each callout out loud.
- Use radar overlays that show locations with labels.
Are Mirage callouts the same in Premier mode?
Yes. The geometry and naming are identical. Premier uses the same map layout and locations, so you don’t need different callouts.
Check out other CS2 map callouts on DMarket:
- Nuke Callouts
- Vertigo Callouts
- Dust 2 Callouts
- Anubis Callouts
- Inferno Callouts
- Train Callouts
- Ancient Callouts
- Cache Callouts in CS:GO
- Overpass Callouts
Trade on the go - install the mobile app of DMarket from Google Play or App Store. Never miss great prices and unique skins. The best CS2, Dota 2, Rust and TF2 marketplace is always at hand!


Follow DMarket on Facebook and Twitter to get notifications about all the posts on our blog, such as CS2 guides and articles, gaming and Esports news.


